Building a Stratum 1 NTP Server with a Raspberry Pi

Introduction
I wanted to build my own NTP stratum 1 time server. An NTP server is a server that connects to the Internet to serve time to clients who can use that time to adjust the clock on their computer. NTP uses stratum levels to determine the distance from the source clock. A stratum 0 NTP server is actually the source clock. This could be something like a GPS satellite, a CDMA or GSM cellular broadcast tower, a cesium fountain, and many other sources. A stratum 1 NTP server is a server that receives time from a stratum 0 source. A stratum 2 NTP server is a server that connects to a stratum 1 NTP server, and so forth. A stratum 16 NTP server is considered as “unsynchronized”.
Using NTP can be very important for many applications. When you visit an “https://” site with your browser, the connection is encrypted with SSL. SSL requires that the time on your clock is synchronized with the time on the server that you are connecting to with your browser. Having accurate time is imporant when evaluating server logs, such as in troubleshooting. When logging into work remotely with a VPN client, the time on your laptop needs to be accurate, and in synch with the time on the VPN server. Even simple things, such as logging into an Active Directory domain or LDAP, require an accurate clock. Many, many, many online transactions, in one form or another, will require accurate clocks.
A Raspberry Pi is a small “system on a chip” board, where all the standard components of a computer (networking, video, audio, CPU, RAM, etc) are on a single board. All that is required is external power, and storage for an operating system, which in the case of the Raspberry Pi is an external SD card. These little devices are cheap, and have been used for everything from powering 3D printers to home automation, such as turning on and off automatic sprinkler zones.
In this post, well setup a stratum 1 NTP server that uses GPS satellites as the time source, and it will deliver that time to the Internet.
Materials
- $35 Raspberry Pi model B, with 512 MB RAM
- $15 Enclosure for Raspberry Pi Model A or B
- $40 Adafruit Ultimate GPS Breakout
- $2.50 CR1220 Replacement Battery
- $13 GPS Antenna
- $4 SMA to uFL/u.FL/IPX/IPEX RF Adapter Cable
- $5 Half-size breadboard
- $7 Premium Male/Male Jumper Wires
- $8 Adafruit Assembled Pi Cobbler Breakout + Cable for Raspberry Pi
So, for about $130 plus tax and shipping, you can have a very accurate stratum 1 NTP server.
One note, however: the Raspberry Pi does not come with a hardware clock, so NTP is required to keep the clock ticking. You may want to install a real time clock (RTC) as well, such as the ChronoDot. The GPS board has an RTC, which is battery backed, so that’s good enough for me. Unfortunately, the kernel can’t see the GPS RTC as a separate hardware device. This isn’t necessarily a problem; if the antenna loses connection to the orbiting satellites, then the GPS RTC will keep ticking away, giving the Pi its time, and NTP will continue to keep the clock corrected, so long as you keep an Internet connection running.
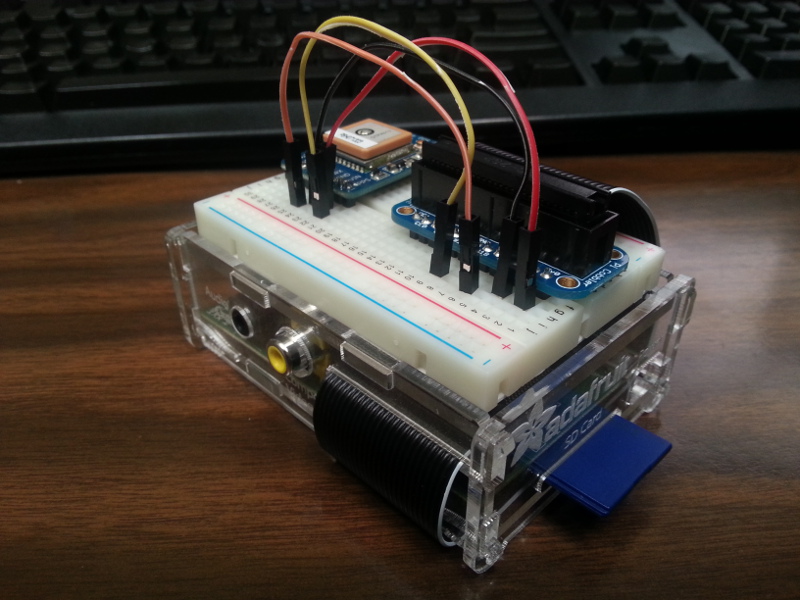
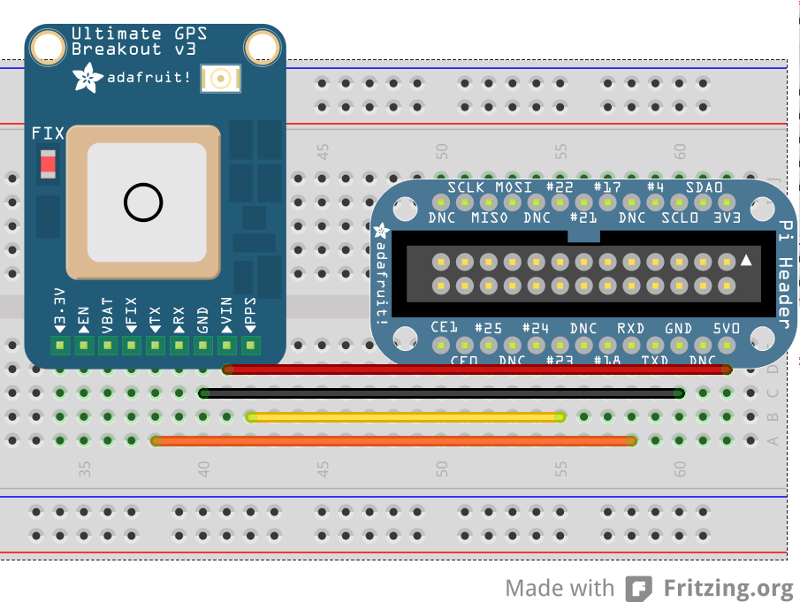
The Hardware Setup
The completed setup will look something like this, including the pin breakout. Note that the GPS PPS output connects to pin #23 on the Raspberry Pi, and the GPS TXD connects to the Raspberry PI RXD. 5V power to VIN, and GND to GND. If you want, you can connect another cable from the GPS RXD to the Raspberry PI TXD, for troubleshooting (not shown). The breadboard back has a sticky adhesive backing that I applied to the case, so it remains permanently fixed.
You should note that you will need to solder the both battery house and the small breadboard breakout pins to the GPS breakout board. This isn’t too difficult, but if you have zero experience soldering, you will want to get familiar with how to tin and solder first, before attempting this build.
Operating System Setup
Rather than using the stock Raspbian, we will be using a fork from Adafruit called “Occidentalis“. The latest version as of this post is “v0.2”. It still uses the Raspbian repositories, but comes with some additional packages pre-installed. Download the image, and write the image to an SD card:
# dd if=/path/to/occidentalis.img of=/dev/sdz
I’m not a big fan of setting up the HDMI and keyboard on the physical Raspberry Pi. So if you’re like me, you’ll want to SSH to it immediately. I wrote a blog post on my personal blog about masquerading ethernet interfaces, so that can help here. Mount the SD card, edit the “/etc/network/interfaces” file, and setup the virtual interface as described in that blog post. Then, when booting up the Raspberry Pi, you can insert an ethernet cable from your laptop to your Pi, and SSH directly.
Install Custom Kernel
Unfortunately, and this royally sucks, the default kernel shipped with Raspbian does not support PPS over any of the hardware pins. Further, the Raspbian kernel does not ship with a PPS module at all. So, we need to use a custom kernel. It sucks, because the kernel is old. Rolling your own custom kernel, means you’re a super villian. However, someone has already done the heavy lifting for us, and it shouldn’t be too difficult to apply the same patches to more modern kernels. However, we’ll just stick with his 3.1 kernel for this post.
Open up a terminal, and as root, install Git then clone his respository:
# apt-get install git
# git clone https://github.com/davidk/adafruit-raspberrypi-linux-pps.git
Now copy over the new kernel and kernel modules:
# cd adafruit-raspberrypi-linux-pps
# cp kernel.img /boot/kernel.img.pps
# cp -a modules/* /lib/modules
Make sure that the “pps-gpio” module is loaded on each boot by making it persistent. Add it to the “/etc/modules” config file by running the following command (make sure you’re appending STDOUT):
# echo 'pps-gpio' >> /etc/modules
Modify the “/boot/config.txt” to reflect the new kernel. Add the following line at the end of that file:
kernel=kernel.img.pps
gpu_mem=16
Reboot, and verify that you are in the right kernel, and that the “pps-gpio” module is loaded:
# uname -a
Linux ntp.example.com 3.1.9adafruit-pps+ #21 PREEMPT Sun Sep 2 10:57:58 PDT 2012 armv6l GNU/Linux
# lsmod | grep pps-gpio
pps_gpio                2314  0
pps_core                7808  2 pps_gpio,pps_ldisc
Compile NTP
The default Raspbian NTP package does not enable ATOM support, which we’ll need to take advantage of. As such, we’ll need to custom-compile NTP. Thankfully, Debian makes this easy. Pull up a terminal, and as root, edit the “/etc/apt/sources.list” file, and add the following line:
deb-src http://mirrordirector.raspbian.org/raspbian/ wheezy main contrib non-free rpi
Now, in your terminal as root, type the following commands:
# apt-get update
# apt-get build-dep ntp
# apt-get source ntp
# cd ntp-4.2.6.p5+dfsg
Now modify the “debian/rules” file, and add “--enable-ATOM” to the configure statement. Also modify the “debian/changelog” file, and append “pps” to the version number. Now build and install the package (this will take a while):
# dpkg-buildpackage -b
# cd ../
# dpkg -i ntp_4.2.6.p5+dfsg-2pps_armhf.deb ntp-doc_4.2.6.p5+dfsg-2pps_all.deb
Configure NTP
NTP uses the local address at 127.127.0.0/16 (see http://www.eecis.udel.edu/~mills/ntp/html/refclock.html#list for more information). Our Adafruit GPS module is a generic NMEA GPS, so it will be using driver 20, or 127.127.20.0. Add the following lines to the “/etc/ntp.conf” configuration file:
server 127.127.20.0 mode 17 noselect
fudge 127.127.20.0 flag1 0 time2 0
This disables PPS processing, and sets the GPS clock as “noselect”, while using other servers to actively set the system clock. This will allow you to figure out the right time for “time2” to fudge. Due to the latency of the signal being carried across the antenna cable, as well as the breadboard cables, when the time arrives to NTP, it will already be slow. So, we need to make adjustments for this.
After making those changes to your “/etc/ntp.conf” configuration file, let NTP run for 24 hours or so to stabilize the local time. Eventually, you’ll see output that may look like something similar to:
# ntpq -pn
     remote           refid      st t when poll reach   delay   offset  jitter
==============================================================================
 127.127.20.0    .GPS.            0 l   23   64  377    0.000  -726.44   6.518
In the above output, this tells me that it takes 726 milliseconds to deliver the time from the tip of the antenna to NTP (I have an SMA extension cable to get the antenna on the roof). So, I need to fudge the time by that value. So, as a result, remodify the “/etc/ntp.conf” configuration file, make the change, and restart NTP (notice the change also from “noselect” to “iburst”, as well as enabling PPS processing):
server 127.127.20.0 mode 17 iburst
fudge 127.127.20.0 flag1 1 time2 0.726
After making the change, restart NTP. Let it sit for a bit, and you should see output such that your GPS antenna has very little offset, and very little jitter:
# ntpq -pn
     remote           refid      st t when poll reach   delay   offset  jitter
==============================================================================
o127.127.20.0    .GPS.            0 l   62   64  377    0.000    0.021   0.003
Finally, we will also need to take into account leap seconds, adjusting our clock as necessary. Create the following shell script, and install it into “/usr/local/bin/leap-seconds.sh”:
#!/bin/sh
cd /etc/ntp
wget ftp://time.nist.gov/pub/leap-seconds.list &> /dev/null
service ntp restart &> /dev/null
Then, create an entry in root’s crontab(5):
0 0 31 6,12 * /usr/local/bin/leap-seconds.sh
Make sure it’s executable:
# chmod a+x /usr/local/bin/leap-seconds.sh
Now modify the “/etc/ntp.conf” configuration file one more time, and add the following line at the top of the file:
# leap seconds file
leapfile /etc/ntp/leap-seconds.list
Restart NTP.
Additional NTP Configuration
It is strongly recommended that your NTP configuration includes additional servers as part of the NTP algorithm to adjust the clock. Even though your GPS antenna will be largely responsible for the time your NTP server serves to the network, you should still use additional NTP servers to synchronize from. NTP allows you to configure up to 10 active servers in your /etc/ntp.conf configuration file. These servers will aide in the clustering algorithm for determining the more accurate time. In general, for this setup, you can expect about an average accuracy of about 60 microseconds from the One True Time, which should be good enough for most applications.
Below is my full /etc/ntp.conf configuration file after all is said and done:
# acls
restrict default kod nomodify notrap nopeer noquery
restrict -6 default kod nomodify notrap nopeer noquery
restrict 127.0.0.1
restrict -6 ::1

# logs
leapfile /etc/ntp/leap-seconds.list
driftfile /var/lib/ntp/ntp.drift
statsdir /var/log/ntpstats/
statistics loopstats peerstats clockstats
filegen loopstats file loopstats type day enable
filegen peerstats file peerstats type day enable
filegen clockstats file clockstats type day enable

# nmea source
server 127.127.20.0 mode 17 iburst
fudge 127.127.20.0 flag1 1 time2 0.728

# additional servers
server 198.60.22.240 iburst
server 137.190.2.4 iburst
server 131.188.3.221 iburst
server 216.218.192.202 iburst
Conclusion
This build isn’t for the faint of heart. It requires a great deal of patience, partly due to compiling software on a single core ARM chip, and partly due to waiting for your GPS antenna to converge. It requires a steady hand with a soldering iron, and a brief understanding of some elecrical engineering. With that said, it certainly isn’t an extremely difficult build.
But, having a stratum 1 NTP server built from a Rasberry Pi can be very rewarding. It draws less than 1 Watt of power, boots up quickly, and the GPS module locks into the satellites quickly. My only concern would be the SD card, which has a limited number of writes. Due to logging the NTP data, it could wear out the SD card faster than normal. Of course, you have backups, but it may be worth considering putting the /var/log/ directory on an iSCSI mount or more stable disk, to lengthen the life of the SD card.
Zimbra calendar problem? Try this easy fix for shared CalDAV calendars. Frequently Asked Questions about Macquarie and UTOPIA
Comments are currently closed.